
Setting up a Proxmox VM to act as a VPN gateway for other containers
192.168.15.0/24 to 192.168.15.1/24. So in this instance: the bridge and the Pia VM had the same IP address, which is not allowed, caused a conflict and just made it impossible to actually connect to the internet in the other containers.
So don't forget to switch it back!On my brand new Proxmox server I want to transparently have some of the containers connect to the internet via a VPN.
Instead of setting up a VPN connection in each container separately, I want to create one single Virtual Machine and have it act as a router/gateway for other containers.
This isn't super trivial apparently. I've found quite a few posts on the internet of people trying to do a similar thing, but never with a detailed guide.
So I decided to make sense of all the information that is out there and give it a go.
Proxmox host changes
A new network bridge interface is needed, and this has to be made on the Proxmox host.
In the "Server View" sidebar go to "Datacenter » your-host-name" and then select "System » Network" on the right. There you can create new network interfaces. Click on the Create dropdown button and select Linux Bridge.
A new dialog will open, here's how I configured it:
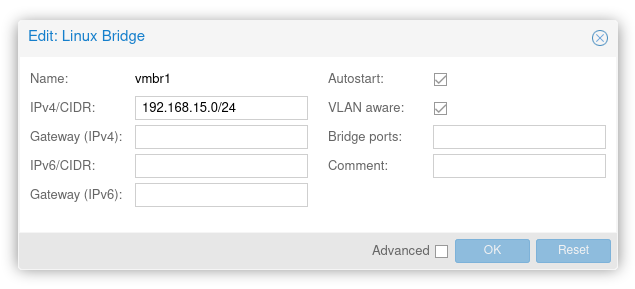
192.168.15.0/24 is the range this "gateway" will serve to other virtual machines & containers. By already setting this here, you'll still be able to actually connect to these machines from the Proxmox host, and thus configure some port forwarding.
The Virtual Machine itself
Create the VM
I'm going to use a Wireguard VPN connection, from PIA, Private Internet Access
Even though you can technically get a Wireguard VPN connection to work in an unprivileged LXC container, doing all the actual forwarding seems to fail, no matter if you're in a priviliged or unpriviliged container. And I've tried for quite a while. So I'm opting for a VM.
I decided to go with Debian 11 for this using the netinstall iso. Obviously I kept the install quite small: no desktop environment, just the essentials.
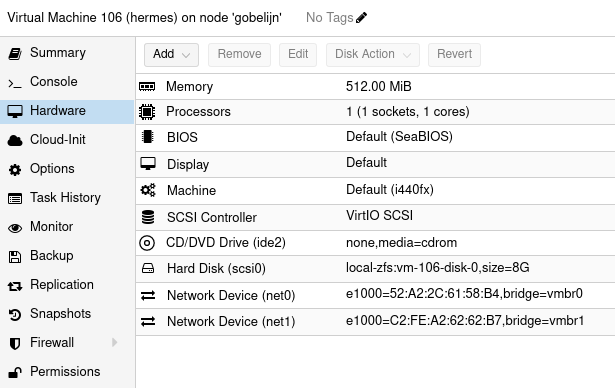
This VM does not need a lot of resources. Just 512 megabytes of memory, 1 CPU core and 8 gigabyte of storage will be plenty.
deb.debian.org mirror, because it blocks VPN connections.Don't forget to add both network bridges to it. Once you're done, it's hardware setup should look like this:
Configure the network
After installing Debian, it's time to get started. You should already have these 2 interfaces:
- ens18: This is the interface connected to
vmbr0, so the "unsecure" connection - ens19: This is the interface connected to
vmbr1, so the interface other containers/vms will use to get "secured" internet
Later, a pia interface will also be added.
Let's configure the ens19 interface first.
This is the interface on which you'll be receiving incoming connections & serving IP addresses. But first it needs an IP address itself.
In this guide I'm using 192.168.15.1, to match the subnet we defined earlier.
Let's add it to the interfaces file:
nano /etc/network/interfaces
And paste this:
auto ens19
iface ens19 inet static
        address 192.168.15.1/24
ens18 a static IP address.
This might be a good idea, since our next action (restarting the network stack) seems to always make it forget its IP address.Restart networking so the changes are applied
systemctl restart networking
ens18 forgot its IP address, simply doing dhclient ens18 should make it get a new one.RTNETLINK: File exists error, you just need to flush the device:
ip addr flush dev ens18Enable forwarding
IP forwarding is not enabled by default, so let's do that now.
nano /etc/sysctl.d/10-wireguard.conf
Paste in the following:
net.ipv4.ip_forward=1
net.ipv6.conf.all.forwarding=1
And load in the changes:
sysctl -p /etc/sysctl.d/10-ipforward.conf
From now on this will happen at boot
Setup your PIA VPN connection
PIA's wireguard VPN has a downside: it uses tokens that expire every 24 hours. So trying to reconnect after 24 hours have passed, will fail.
Luckily, plenty of scripts to automate this process exist, even some made by PIA themselves. I found a very interesting and short one, made by jbagwell27 called pia-autoconnect-wireguard
I've made a few changes to the script, so it'll work for our usecase. First of all: install certain dependencies:
apt install git curl jq iptables wireguard-tools netselect-apt
Download PIA's certificate from their Github repository:
mkdir /var/lib/pia
curl https://raw.githubusercontent.com/pia-foss/manual-connections/master/ca.rsa.4096.crt --output /var/lib/pia/ca.rsa.4096.crt
To make it easier to manage changing any values in the future, we'll create a single variable file:
mkdir /etc/wireguard/helper/
nano /etc/wireguard/helper/vars
Then paste in the following:
PREFERRED_REGION="us_atlanta" # The preferred region to connect to
PIA_USER="p0123456"           # Your PIA username
PIA_PASS="xxx"                # Your PIA password

INSECURE_FACE="ens18"         # NIC connected to the internet
SECURE_FACE="ens19"           # NIC other containers will connect to
WG_FACE="pia"                 # Wireguard/PIA NIC
I had to make some modifications to the script, so that it includes some PostUp and PostDown actions. Let's create it manually:
nano /usr/local/bin/pia-autoconnect.sh
Paste in the following, but don't forget to edit the PREFERRED_REGION, PIA_USER and PIA_PASS variables.
#!/usr/bin/bash

source /etc/wireguard/helper/vars

# This only works with Wireguard with port forwarding disabled.
VPN_PROTOCOL=wireguard
PIA_PF="false"

selectedRegion=$PREFERRED_REGION

serverlist_url='https://serverlist.piaservers.net/vpninfo/servers/v6'

# Make sure curl always uses the "insecure" network to download something
curl() {
    command curl --interface $INSECURE_FACE "$@"
}

all_region_data=$(curl -s "$serverlist_url" | head -1)

get_selected_region_data() {
    regionData="$(echo "$all_region_data" |
        jq --arg REGION_ID "$selectedRegion" -r \
            '.regions[] | select(.id==$REGION_ID)')"
}

get_selected_region_data

WG_SERVER_IP=$(echo "$regionData" | jq -r '.servers.wg[0].ip')
WG_HOSTNAME=$(echo "$regionData" | jq -r '.servers.wg[0].cn')

timeout_timestamp() {
    date +"%c" --date='1 day' # Timestamp 24 hours
}

generateTokenResponse=$(curl -s --location --request POST \
    'https://www.privateinternetaccess.com/api/client/v2/token' \
    --form "username=$PIA_USER" \
    --form "password=$PIA_PASS")
token=$(echo "$generateTokenResponse" | jq -r '.token')
tokenExpiration=$(timeout_timestamp)
PIA_TOKEN=$token${nc}

export PIA_TOKEN

if [[ -f /proc/net/if_inet6 ]] &&
    [[ $(sysctl -n net.ipv6.conf.all.disable_ipv6) -ne 1 ||
    $(sysctl -n net.ipv6.conf.default.disable_ipv6) -ne 1 ]]; then

    sysctl -n net.ipv6.conf.all.disable_ipv6
    sysctl -n net.ipv6.conf.default.disable_ipv6
fi

privKey=$(wg genkey)
export privKey
pubKey=$(echo "$privKey" | wg pubkey)
export pubKey
wireguard_json="$(curl -s -G \
    --connect-to "$WG_HOSTNAME::$WG_SERVER_IP:" \
    --cacert "/var/lib/pia/ca.rsa.4096.crt" \
    --data-urlencode "pt=${PIA_TOKEN}" \
    --data-urlencode "pubkey=$pubKey" \
    "https://${WG_HOSTNAME}:1337/addKey")"

export wireguard_json

if [[ $(echo "$wireguard_json" | jq -r '.status') != "OK" ]]; then
    echo >&2 -e "Server did not return OK. Stopping now.${nc}"
    exit 1
fi

wg-quick down pia

dnsServer=$(echo "$wireguard_json" | jq -r '.dns_servers[0]')
dnsSettingForVPN="DNS = $dnsServer"

mkdir -p /etc/wireguard

echo "
[Interface]
Address = $(echo "$wireguard_json" | jq -r '.peer_ip')
PrivateKey = $privKey
PostUp = /etc/wireguard/helper/add-nat-routing.sh
PostDown = /etc/wireguard/helper/remove-nat-routing.sh
$dnsSettingsForVPN
[Peer]
PersistentKeepalive = 25
PublicKey = $(echo "$wireguard_json" | jq -r '.server_key')
AllowedIPs = 0.0.0.0/0
Endpoint = ${WG_SERVER_IP}:$(echo "$wireguard_json" | jq -r '.server_port')
" >/etc/wireguard/pia.conf || exit 1

wg-quick up pia
Don't forget to make it executable:
chmod +x /usr/local/bin/pia-autoconnect.sh
Create the up & down hooks
Now create the file that sets up the NAT after PIA is connected:
touch /etc/wireguard/helper/add-nat-routing.sh
chmod +x /etc/wireguard/helper/add-nat-routing.sh
nano /etc/wireguard/helper/add-nat-routing.sh
Paste in the following lines that will actually route the data:
#!/bin/bash
source /etc/wireguard/helper/vars

iptables -t nat -A POSTROUTING -o $WG_FACE -j MASQUERADE
iptables -A FORWARD -i $SECURE_FACE -o $WG_FACE -j ACCEPT
#iptables -A FORWARD -i $SECURE_FACE -o $INSECURE_FACE$ -d 192.168.0.0/16 -j ACCEPT

systemctl restart isc-dhcp-server
Now create the file that brings down the NAT when PIA disconnects:
touch /etc/wireguard/helper/remove-nat-routing.sh
chmod +x /etc/wireguard/helper/remove-nat-routing.sh
nano /etc/wireguard/helper/remove-nat-routing.sh
And make it flush all the iptable rules:
#!/bin/bash
source /etc/wireguard/helper/vars

iptables -F

systemctl restart isc-dhcp-server
Create a SystemD service
Now let's create a systemd service, which will start the connection at boot.
nano /etc/systemd/system/pia-connect.service
And pase this in:
[Unit]
Description=PIA-Wireguard Connection

[Service]
Type=oneshot
ExecStart=/bin/bash /usr/local/bin/pia-autoconnect.sh

[Install]
WantedBy=multi-user.target
And enable the service (but don't start it yet):
systemctl enable pia-connect.service
Setup cronjob
We want to restart this script automatically every day, so that it'll always have a valid connection key. We'll use a cronjob for that:
crontab -e
And paste in this line:
0 4 * * * /usr/bin/systemctl restart pia-connect.service
This will run the script every day at 04:00 at night.
Configure DHCP server
Let's automatically serve IP addresses to containers that connect to us without setting a static IP address
apt install dnsutils isc-dhcp-server
We have to make sure the DHCP server does not start by itself, the network config will take care of that
systemctl disable isc-dhcp-server.service
Now actually add the DHCP configuration:
nano /etc/dhcp/dhcpd.conf
And add the following:
authoritative;

subnet 192.168.15.0 netmask 255.255.255.0 {
  range 192.168.15.128 192.168.15.254;

  option routers 192.168.15.1;
  option subnet-mask 255.255.255.0;
  option broadcast-address 192.168.15.255;
  option domain-name-servers 8.8.8.8;

  default-lease-time 86400;
  max-lease-time 259200;
}
Then change the default interface for the DHCP server:
nano /etc/default/isc-dhcp-server
And make sure it looks like this:
INTERFACESv4="ens19"
INTERFACESv6=""
Test it all!
Bring up the connection:
systemctl start pia-connect
Now test the connection by getting your current IP address:
curl http://wtfismyip.com/text
Potential problems
DNS resolver doesn't work
When creating a new container, it's DNS is set to the same value as the Proxmox host. This is probbaly not reachable over the new bridge we've made. So don't forget to configure this to something else, like 8.8.8.8
Unable to install containers from "Proxmox Helper Scripts"
It's best to install the containers using the default bridge, and then switch it to the new one afterwards.
Comments
Joe
Josh Taylor
RB
Skerit
Jaeger
Skerit
ZA